It’s been over two years since my last post, and while I disappeared from the blogging world, I have tried to stay in touch with my online math family via Twitter. There have been many ups and downs in my life and teaching career over the past few years, but I wanted to break out of my blog hiatus to share some special news with you. Starting July 1st, I will be the new Supervisor of Mathematics 6-12 for Marlborough Public Schools in Massachusetts.
In this new role, I will dive into the world of curriculum, instruction, and professional development, and hopefully along the way make a positive impact on the lives of both our middle and high school students. While I will not be teaching in my own classroom on a day-to-day basis, I definitely still consider myself a teacher. The age of my audience has changed, but I know that I can have an impact on a greater number of students via their teachers who I will get to work with every day. I am lucky to have some amazing colleagues at MPS and I know that together we can make a difference in our schools.
Someone once told me, “To be a good administrator you must never stop thinking like a teacher.” This comment has and always will stick with me, because often what’s important to a teacher does not always align with administrative initiatives and goals. I know I have a lot to learn as I transition into this new role and will make mistakes along the way. But whenever I need to make decisions that will impact teaching and learning, I vow to ground myself in my roots. And my roots are as a teacher.
My hope is that this blog post will be the first of many about this new adventure. I will share my successes and failures, and most likely post some lesson throwbacks from these past few years. If you have any advice for a new administrator, I’d love to read it in the comments.
My math department analyzed some MCAS data a few weeks ago and found some interesting information. There are 6 open response questions on the 10th grade math MCAS test: each worth 4 points for a total of 24 points. Every student who scored Advanced or Proficient in our district earned at least 15 points on the open response questions. On the other hand, students who scored needs improvement earned an average of 11 points, and students who failed earned an average of only 3 points. Out of 24. We have some work to do, especially with our English Language Learners.
My student smart goal for the year is to work with my ELLs on open response questions. This is my first attempt at sheltering an MCAS open response question:
The original MCAS question can be found here. You will notice that I didn’t change any of the words, word order, or questions. This is important to me when sheltering an assignment. This question is text-heavy and quite a challenge for my students, but I want to keep the integrity of the question as much as possible. while providing scaffolding. The goal is to slowly remove the scaffolding as the year goes on.
I bold, underline, or italicize key math words and try to do this consistently on assignments. I also gave students highlighters when we worked on this so they could practice identifying they parts they thought were most important. And they don’t just highlight the words that I have made stand out. They notice a lot. Also, many of the directions say to show OR explain how you found your answer, but I want students to practice both.
Before starting, my co-teacher and I pre-taught the word “represents” because it was a word we didn’t think they would know. She made a couple slides showing these two images and we talked about them:
As a class, we read the intro and first question. We paused to talk about: “expression”; “minimum”; and “enough.” Students then worked on simplifying Leo’s expression on their own, and we came back together for the explaining. The sentence frames have been a big hit so far. Many of my students don’t know where to start, or are just plain scared to start because they don’t want to say/write something wrong. The frames have been providing them with an invaluable structure, and most are willing to attempt to complete the sentence when it’s already started.
We continued this pattern throughout the question: we read together, students were given independent work time, and finally we came back together to wrap up each piece. In all, this question took about one hour to complete, divided into two 30-minute chunks. At the end, our students were genuinely surprised and happy to see how much work and writing they had completed. This is definitely something my co-teacher and I will continue to work on with our students, and when possible, start to remove the guidelines. Please let me know if you have any other tricks for us to try!
This year I am co-teaching an SEI (Sheltered English Immersion) College Prep Algebra 1 course. It is comprised of 16 students, from grades 9-12, whose first language is either Spanish or Portuguese. Most are currently at Wida Level 1 or 2. A few of these students attended 8th grade in our district last year, but the majority moved to America after January 2016. Due to the wide range of math and language abilities, my co-teacher and I are trying to find a balance between teaching new skills, remediating basic math skills, and teaching appropriate vocab/language.
We started the year with simplifying expressions using the order of operations and then moved onto solving equations. One structure we have developed is to have students solve a problem, and then explain the steps they followed. We provide transition words, sentence frames, and an example, so that students have a starting point. After students solve and write about their process, we pair them up and have them practice reading aloud their explanations. We also tried have half the room solve #1, and the other half solving #2, then pairing them and explaining a problem the other student had not solved yet, with the goal being that they could still understand. Both ways seemed to work equally well and I think we will continue to experiment as the year goes on.
I really like this structure as I think it is making students feel more confident in their solving ability as well as their understanding of these math phrases. We say them aloud all the time in class, so it’s important that students recognize them when they are spoken, and can implement them as well.
Since I had recently finished reading Instant Relevance: Using Today’s Experiences to Teach Tomorrow’s Lessons by Denis Sheeran, I knew I needed to have my PreCalculus students do this activity. We were days away from reviewing the trig ratios and I knew this would be an engaging and fun way to have them practice.
I quickly did some research on The Dab. Sports Illustrated published a helpful article on The Dab’s history in sports. While there is some disagreement over the originator of The Dab, most people agree it originated in the Atlanta hip-hop scene. There are also some fun celebrity videos in which people are taught to dab: Jason Derulo teaching James Corden around minute 7:05 and Ellen Degeneres teaching Hillary Clinton.
Then, I got to work putting together the actual lesson. Special shoutouts to Matt Vaudrey for his amazing Mullet Ratio lesson which inspired some of the format, and Lisa Bejarano for her feedback and input to the lesson itself.
The General Lesson Outline:
-Look at images of dabs and ask students which is the best one? Try to figure out what makes a dab, a dab.
-Continue debating. Is one dab dab-ier than another? The dab-iest?
-Calculate the dab angle of some famous people (gallery walk style around the classroom)
-Calculate their own dab angle
-Decide whether or not a “golden dab” angle exists
See slides below for a better understanding of the lesson flow:
What actually happened?
Most students were immediately engaged in The Dab Debate and had an opinion of which dab they liked the best. However, a few immediately told me that The Dab was dying (or was already dead according to which student was asked). This was sad to hear. But there were enough students thoroughly debating for their favorite dab that the “silliness” of the conversation took over the room and we proceeded at full speed ahead.
I quickly learned that I had a very different opinion of what makes a really good dab than my students do. For example, I don’t particularly like Cam Newton’s dab because his arm lines have different slopes:
However, my students immediately told me that the second arm doesn’t matter. Doesn’t matter AT ALL. This kinda blew my mind. In fact, sometimes it looks like the person is trying too hard if the arms match perfectly. Such as tennis player Victoria Azarenka:
I think her dab is great. My students on the other hand, said things like: “She forced it.” “She looks like she practiced that for hours.” They are a tough crowd, but know much more about The Dab than me, so they are the experts here.
I asked for some clarification on having both arms line up. This is okay sometimes. It was hard for them to describe, but they were very adamant that it couldn’t look like you were trying to hard. Their dab advice: Look confident. Look comfortable. Be natural. Just hit it.
So, with that advice, we set about measuring and calculating the dab angle of Cam Newton together. Ignoring the second arm, the triangle we drew looked like this:
Each student had a ruler and made their own triangle for Cam’s dab on this handout:
Download handout here: golden-dab-handout
Each student picked two side lengths and the appropriate trig ratio to use. We also had a brief discussion about similar triangles and why this method of using trig ratios based on side lengths measured from a picture would be comparable to measuring in real life. Lastly, we talked about the possibility of measuring errors and decided we were calculating “close enough” dab angles.
Then, students had the chance to choose 4 of the 6 “celebrities” located around the classroom to measure and calculate. My principal graciously dabbed for me and his image drew a large crowd.
Betty White had the smallest dab angle, around 20 degrees, and everyone agreed she was one of the best, but mostly because of who she is. Our principal’s was about 50 degrees and this also elicited a positive reaction.
I sensed that many students did not want to dab for Part 3, so I asked for volunteers and we all measured their dabs instead. Students used any of the 3 trig ratios they wanted (sine, cosine, or tangent) based on whichever side lengths of the triangle they measured.
At the end of class, I asked the big question, Is there a “Golden” Dab angle? The answer: 5/16 say yes. 11/16 a resounding no.
Here are the 5 student responses saying yes:
S1: 45 degrees. Because that is half of 90 degrees and that would be a perfect dab.
S2: I believe Cam Newton has the golden dab because he is closest to 45 degrees, 48. He looked like he knew what he was doing and looked confident, which meant he dabbed almost perfectly without overdoing it.
S3: The best dab angle is 30 to 40 degrees because it looks the cleanest.
S4: It is 45 degrees because you have maximum effect without overdoing it. You also look much cooler. While it is nearly impossible to know the exact angle while you’re doing it, you should try for 45 degrees. Practice makes perfect.
S5: It would be between 33-45 degrees because it looks the best and is the most common. But almost any angle could be a golden angle depending on the person.
General comments from the rest:
-Everyone is different and unique so for a dab to be “perfect” to you, you just have to have your own style.
-If you take another picture of the same person again, it wouldn’t have the same angle as before.
-There isn’t one exact way to do the dab.
-There isn’t one angle because everyone can dab however they want.
-There isn’t one because everybody’s arms are different lengths and people have different styles.
-It only depends on the person and confidence in doing it. They can’t seem like they’re trying too hard. The surrounding sometimes matters too.
-It all depends on someone’s surroundings, persona, swagger, and confidence. The dab depends on the person, therefore there is no golden dab angle.
We didn’t have time to work on the extension questions, but I am including them here in case someone else wants to use them.
• Can you dab at 30o? 60o? Which angle feels the most comfortable? The least? Why?
• Sketch a dab with an angle of 90o. Is this feasible in real life? Why or why not?
• If a person creates a 25o dab and their combined dab arm length is 44 inches, how high vertically would their hand be above the ground?
The conclusion: There isn’t a lot of math in this post, but there was a lot of math done in class. However, it seemed like a natural part of the conversation because we needed it to talk about a golden dab, but then collectively decided to throw it out the window as most students agreed there was no one right way to dab since everyone has their own style. But after closely comparing dabs, and ignoring personal style/confidence, many decided that 45 degrees made for a pretty good one. But the perfect one? A dab done with confidence.
This was the perfect activity to review finding angles using the trig ratios. If you try this with your students, please share how it goes! I’m curious how other students around the country view the second arm’s importance to the dab, and whether or not a 45 degree golden angle is upheld or not, or do we agree it’s all about your swagger?
It’s no surprise that I’m completely obsessed with Desmos and want to share it with teachers everywhere. This past year, I was given a few opportunities to run Desmos professional development for the teachers in my district, and in a few surrounding Massachusetts towns. Several people have asked me for my PD plan, so here it is:
General Structure:
Let’s Learn!
Let’s Play!
Let’s Teach!
Let’s Build!
Let’s Learn!
In the intro, I share some Desmos logistics and explain/show the difference between the calculator and activities (briefly touch upon polygraph vs activity builder vs card sorts (future PD, yay!), etc). I demonstrate basic calculator moves such as sliders, tables and regressions. But mostly, during this phase, I direct participants to Learn Desmos by finding a tutorial they are interested in and trying it out. Depending on time, you can also share the Desmos Scavenger Hunts and let participants work through them.
Let’s Play!
I choose a couple activities appropriate for the grade level of the participants, and we play! I tell participants to put on their student hats and imagine I am their teacher. I briefly explain the activity directions, give out the class code, and let them go to town. I stop at selective checkpoints to showcase various graphs or student answers from the teacher dashboard, talk about key vocab that I see being used, or to address any misconceptions I see, etc. Some of my favorite activities to choose are Polygraph: Parabolas and Marbleslides: Lines. These activities are obviously super fun, but also a middle ground for a range of middle and high school teachers in the same room. It’s always a struggle to make them stop playing so we can learn something else.
Let’s Teach!
This phase goes hand in hand with “Let’s Play,” and often, they overlap during my PD sessions. After playing one activity, we stop and analyze the activity with our teacher hats on. We talk about teacher moves that I made, implementation strategies, possible implementation challenges, and really analyze the teacher dashboard. I bring up past activities from my Desmos history and show participants some student work. It’s also during this phase that I finally show them the search engine on the teacher site and ask them to look up a topic they are teaching within the next day or two and see what they can find. Every single teacher has always found something they could potentially use that week.
Let’s Build!
I show teachers how to bookmark activities they find using the search engine, and then how to copy/edit them so they have a starting point. When there’s time, I walk participants through the basics of building an activity, and hopefully provide time for them to try making one with a partner. Unfortunately, this is usually the phase that gets cut out due to time constraints. One hour or afternoon is simply not enough to learn all of Desmos, but it’s definitely a start!
Please feel free to use this structure if it works for you, but make sure to adapt for your own personality/time constraints, and most importantly, find out what your learners want/need to know!
At Twitter Math Camp, I gave two presentations. One “My Favorite” on using the engineering design process in math class, and a second on 3D printing in math class. Here are my resources:
Using the Engineering Design Process in Math Class:
Get out your calendars and mark them now! Twitter Math Camp 2017 is being held from July 27th-30th at Holy Innocents’ Episcopal School in Atlanta, Georgia.
Having just returned from my 4th Twitter Math Camp (TMC) experience in Minneapolis, I feel the need even more to book my entire summer plans around this camp. I like to spend time in the summer with my family and friends; go to the beach; read a book for fun; nap; go to the drive-in, etc. But I also NEED to spend four days in person with my MTBoS family. The people and sessions at TMC invigorate my passions and spirit and convince me that I can conquer anything in the upcoming school year.
I can’t possibly recap everything I took away from TMC16, but here are some of my favorite takeaways. I hope they become some of your favorites too! Grab a drink, there are a lot 🙂
Favorite Pre-TMC Outing: After arrival, I adventured to the Minnehaha Falls with a small group. The weather wasn’t the best, but we had a fabulous time exploring the falls and walking to the confluence of the Mississippi River and Minnehaha Creek.
Favorite New Desmos Calculator Feature: Desmos now has audio capabilities for visually impaired and blind students. Use Command F5 for the voice option, and Option + T for the audio trace. Desmos will read the expression being typed, and then play a graph used a pitched audio representation. Kudos to Desmos for striving to be fully accessible to all users!
Favorite New Desmos Activity Builder Feature: Card sorts! Ask Desmos and you shall receive! By turning on the “Labs” option once you’re logged into Desmos, you now have the option to build card sorts within the activity builder platform. I made a cart sort for Quadratic Equations, and I can’t wait to make more and then also steal from the crowdsourced list. My group loved that we can input card sorts already created; ask students to sort in more than one way; narrow responses by asking for a specific number of cards in a pile; and ask students to analyze why someone else sorted the cards a different way. The possibilities are truly endless, and you can check out the card sort bank here.
Favorite Passionate Educator Title: Chief Evangelist. In her keynote speech, Sara VanDerWerf challenged us to become “Chief Evangelists” for our passions in math education. Sara said, “Sharing your best with others who can benefit is a responsibility and opportunity that falls to everyone” and “To be good at evangelizing, you’re gonna have to practice.” You also need to prepare mini-elevator speeches for each of your passions so you’re ready to share, and tweak them depending on your audience (students, parents, teachers, leaders). I’m going to spend some time this summer narrowing down my list of math education passions to figure out what I want to advocate for.
Favorite Dorm Life: While not all aspects of Dorm Life at Augsberg College were glamorous (looking at you, shower stalls), I had a complete ball living with some TMC-ers for four days. Waking up and having morning bathroom chats about math ed, doing the wobble in common areas late at night, and watching the bachelorette with a huge crew were all completely memorable TMC experiences.
Favorite ELL Strategy: The snowball activity is a great way to get students writing, reading, and speaking in math class. Have students answer a prompt on paper, crumple up the paper, and throw it somewhere in the room. Each student then finds a new paper,
reads the response, and either 1) Adds a new idea 2) Contributes 3) Corrects something
written. After going through the cycle three times, ask students to share ideas out loud
from whatever paper is in front of them. It’s anonymous, non-threatening, and fun for students. And again, it provides them with an outlet for individual think time, following by writing, reading, and speaking. Priceless.
Favorite PD Strategy: To assess participant’s understanding during professional development, I highly recommend using the “Filling in Circles” strategy modeled by Michelle. Start by identifying the key concepts of the session, or in our case, the barriers to implementing responsive stations. Then, have participants continually reflect on the topics and fill in the circles as their learning and understanding grows. Facilitator is able to see what topics need to be discussed more, and participants are able to ask better questions about what they want/need to know. Very easy and very powerful.
This slideshow requires JavaScript.
Favorite Mapping Tool: Popplet. Use it as a mind-mapping tool or to help students think/learn visually. We used it to map skills and identify gaps.
Favorite Restaurant: Pizza Luce! I had Baked Potato pizza both times we went there because it was just SO GOOD. They were also very accommodating of our large groups.
Favorite Shared Experience: Jonathan talked about how he created a shared
experience in his school by creating “Varsity Math” for his calculus and statistics
I’m on the team!
students. He branded them with shirts, stickers, and inspirational speeches; and the kids just LOVED it. They bought in. They felt like they were part of a special community… because they were. Jonathan even graciously invited all of TMC16 to join the team. How can we create shared experiences for the students in our own communities?
Favorite JLV Reminder: In Jose Vilson‘s keynote speech on “TMC16, Race, and What We’re Not Talking About,” he challenged us to lead hard conversations and be okay with feeling uncomfortable. He also reminded us that we have students who are much more capable of talking about this stuff than we are; often because they have less filters. He told us to “get out of their way” but provide an outlet to let it happen. This was a much needed reminder for me, because I often feel like I should/need to have all the answers, so when I don’t, I avoid the conversation. I know I need to work on this, and my students can probably help me. Watch Jose’s keynote here.
Favorite “Getting Triggy With It” Activity: Kristen led an excellent session on how to make trig and the unit circle not a mystery. Grab all her resources here! My favorite activity was using one triangle drawn on patty paper to construct the unit circle. Simple approach but nicely shows how all the key points are determined.
Favorite Verb: Edmund Harris and Chris Shore reminded us that modeling is a verb. It’s something kids should be doing, not something given to them. Modeling is a: Creative. Active. Process.
Favorite Physical Activity: Sara graciously brought her Backwards Bike to camp, and let me ride it as much as I wanted. If you’re not familiar with backwards bikes, watch this video. Even though I came home with several bike battle wounds, I had an absolute blast trying to ride this thing. Even after just a few times, I felt like I was making progress and coming up with new strategies to try out. Now I’m off to find someone to make one for me.
Favorite Project: Sam shared a project he does with students called “Explore Math” so they can explore math outside of school and see its beauty. He wrote about the project on his blog and shared the website he asked students to explore. It’s a “low stakes, high reward” activity. Some kids will do the bare minimum, but others will take it to levels that Sam wasn’t even expecting. His recommendation is to keep it open, keep the mini explorations mini, and don’t compare projects.
Favorite Pre-Assessment: Don’t have one yet, need to make them! Michelle led us through an eye-opening morning session about identifying the gaps in students’ understanding and then using responsive stations to address those gaps using differentiation. I’m excited to follow Michelle’s instructions to create appropriate pre-assessments. There should only be one skill per question and as short as possible. Focus on what pre-skills students need to know in order to be successful with new content, don’t worry about the would-be-nice-to-know. The goal of the pre-assessment is so you can figure out where students are at, and provide them with learning opportunities if they don’t know, and learning opportunities if they do know (enrichment). Elissa wrote a great recap of the entire three days.
Favorite Call to Action: Tracy Zager‘s keynote speech titled “What do we have to learn from each other?” was inspiring and community-driven. She stressed that we need to stop pitting content and pedagogy against each other; we need to stop pitting elementary and high school teachers against each other. Neither of these things is productive for our community. We all have an important role in building our students’ conceptual understanding, and we need to work together to get it done. Tracy’s call to action is to analyze whom you are following on Twitter, and make sure you have a variety of contacts you can reach out to for support and to ask questions. Watch Tracy’s keynote here.
Favorite Fraction Problems: After Tracy’s talk, I pushed myself to attend Brian Bushart‘s session on fractions: a place I knew I would feel out of my comfort zone as a high school teacher. One of the reasons Brian said fractions are so hard for students, is due to practices that simplify or mask the meaning of fractions.
By finding a common denominator, you aren’t comparing fractions anymore. You’re now only comparing the whole number numerators. Cross multiplying is an example of masking; you’re getting rid of the fractions and comparing whole numbers. This masks the fact that you’re still comparing two fractions. Neither of these strategies takes into account the size of the fractions and therefore rob students of sense making. Brian then shared a bunch of strategies for how to deal with this, and I will lead you directly to his documents to learn more.
Favorite Fraction Big Idea: Another huge idea that Brian threw at us is the difference in how whole numbers and fractions are treated as adjectives and nouns. Look at the slides below for comparison.
Whole Numbers:
Fractions:
I’ve never really thought about it this way before, so this was a *mind blown* moment for me, and others at my table. Many students don’t actually gain enough understanding about fractions to realize that fractions are actually numbers and can be represented on a number line. They get stuck at adjectives (1/2 a cake) instead of moving onto nouns. This is where we need to get!
Favorite “Make It Stick” Strategy: In her session, Anna talked about the various ways she uses strategies from Make It Stick in her classroom. My favorite strategy she discussed was Calibration. The goal is to “replace a subjective experience or feeling with an objective gauge outside ourselves.” It stems from the “Illusion of Knowing” in that we think we know something, but really we only have a familiarity with it. The book recommends providing more opportunities for students to test themselves, review again, and test again. Quizzes need to be low stakes. I chose this as my favorite, because it ties in nicely with my morning session theme of helping students to fill in gaps.
Favorite Dylan Kane Confession: Dylan Kane‘s keynote speech titled “More than Resources” was one of the most honest and open talks I’ve ever heard. Dylan’s confession that he thought he was doing a good job when he started, but then realized he could be doing much better, really stuck with me. His big lesson learned was: “My intuition isn’t very good, because we see what we want to see.” Dylan was stealing all the great resources from the MTBoS, but realized that great resources do not equal great teaching. He challenged us to think about what will specifically work with our own students; and deliberately practice what we want to get better at. I haven’t come across a video of Dylan’s keynote yet, but you can access his resources here.
Favorite Upcoming Books to Read:
Tracy Zager: Becoming The Math Teacher You Wish You’d Had [Expected: December 2016]
Denis Sheeran: Instant Relevance, Using Today’s Experiences in Tomorrow’s Lesson [Expected: August 2016]
Favorite Song: Greg answered a call from the twitterverse to write a song about the cubic formula. He answered with the most epic sister act version ever… enjoy:
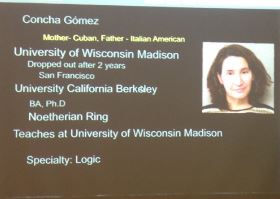
Favorite Student Quote: I know what you’re thinking, there were no students at TMC16 so how can I have a favorite student quote? Well, in Annie‘s flex session on “Mathematicians: More than just white dudes” she shared this student quote: “Are there any mathematicians like me?” This question led to her creation of the Mathematician’s Project, where she showcases one mathematician every Friday (as long as they aren’t an old, white, rich, dead man) in order to show her students that anyone can be a mathematician. She includes their name, date of birth, ethnicity, background biography, major accomplishments, and math specialty. She even polled her students to see the types of people they wanted to learn about, and had students write their own mathematician bios. The shift in her classroom culture was unmeasurable.
Favorite Icebreaker: Amy taught us an amazing new icebreaker that I can’t way to play with my students when school starts called “Go Ahead – Break the Ice.” Break students into small groups, and give them three minutes to collectively come up with a favorite book, movie and game. Then, have students list all the ways they came to the decisions they did. This leads into a great discussion on group norms and how to work with other people. Some of the decision-making strategies were: “strong arming, time pressure, majority rules, brainstorm, survey, throw out ideas until they stick, pickiest gets the choice, narrow the choices, help those who aren’t speaking up, make sure everyone has a voice, etc…” It was a really fun activity to get to know your group, and have time to talk about group dynamics.
Favorite Day of the Year: Hannah loves celebrating birthdays and she shared some great ideas for celebrating in the classroom. She does birthday shoutouts on the board and buys cheap birthday seat covers. She sees increased positivity in her classroom culture and her students love it. She also uses birthdays to talk about what is and is not a function:
Favorite My Favorite: I can’t really put into words out much Glenn means to me in this community. Watch his talk here, and be as thankful as I am that he didn’t turn around.
Thank you to everyone who helped make my experience at TMC16 an amazing one! Much MTBoS love ❤
NCTM Annual Conference 2016 – San Francisco
Friday, April 15, 2016: 2:45 PM-4:00 PM Moscone 2008
Description: The emphasis on turning your math classroom into a STEM one can seem daunting. How can we bring in engineering authentically? Experience the engineering design process through a math lens and learn how to transform meaningful tasks, such as Barbie Bungee and Catapult Launchers, into challenges worthy of an engineering design team.
[The below activities can be found in various textbooks or online sites]
Bouncing Ball Investigation (Exponential)
Mini Golf Hole Design (Angles, Reflection)
Buried Treasure Maps (Triangle Congruence)
Food Container Design (Geometry)
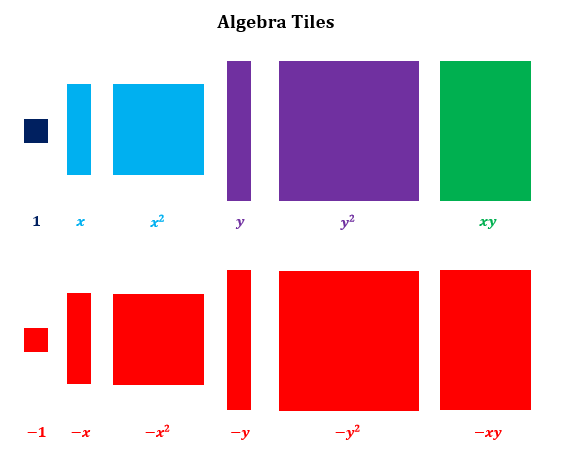
While doing a quick search on the MTBoS Search Engine for lesson ideas on using algebra tiles, I came across this really cool project idea from Hoppe Ninja Math. She had her students create works of art using the algebra tiles, and I just knew that I had to have my students do the same.
We played around with the algebra tiles for one class period and experimented with adding and subtracting polynomial expressions.
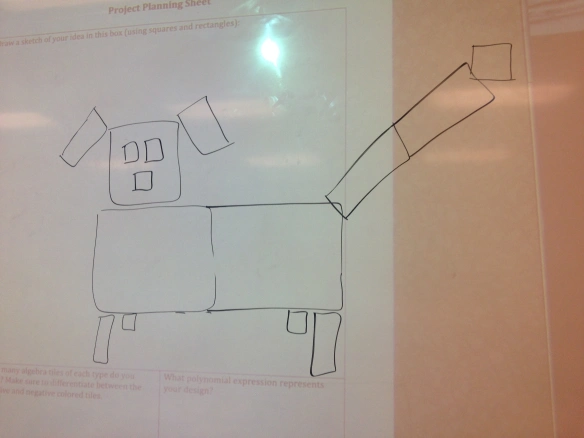
The next day, I introduced the project guidelines and drew a practice image on the board (see my lovely dog below).
Then, students started creating! Most began by using the actual algebra tiles to play around with building different images. Then, they sketched their designs on the paper and recorded the number of tiles they would need. After writing and simplifying their expression, they cut out the necessary amount of algebra tiles from color copies of these printouts that I made:
In all, I gave students 1.5 class periods to work on this task. Some students completely finished during this time, and the rest finished for homework or came in during homeroom or after school to work on it.
The finished designs were so awesome that I had such a difficult time choosing which ones to show off:
Overall, I loved this project for a few reasons: 1) My students loved it 2) They were able to practice simplifying polynomial expressions 3)…in a creative manner!
One change I would make for next year is regarding a simplified expression that equals zero. Many of my students thought it would be really fun to create a design in which all of the tiles negated each other and simplified to zero. This is fine in my book; however I would still want those students to write the entire expanded expression on their artwork, and then show that it equals zero. Some did this, some did not, but it would be an easy change to implement next time.
If you try this, please tweet me some pictures; I would love to see them!
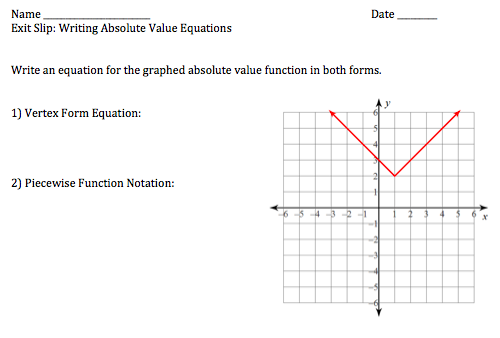
Learning Target for Students: I will be able to write the equation of an absolute value function using piecewise notation.
At this point, we have spent many days graphing absolute value functions from tables and directly from examining the vertex form equation. We have also discussed the characteristics of absolute value functions.
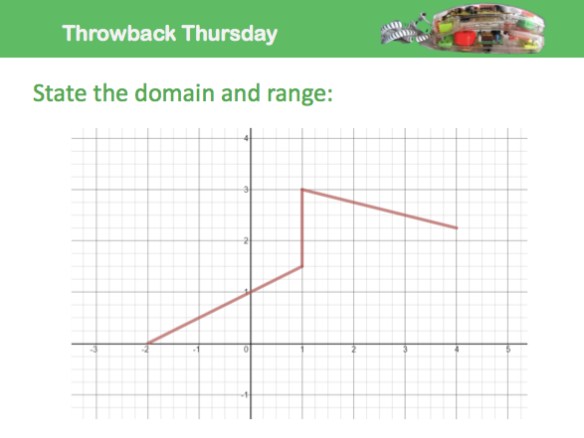
When students entered the classroom, this warm up problem was posed to them:
I chose this problem as our “throwback” because I wanted students to recall how to find the domain and range for a relation, since this skill would be necessary for today’s lesson involving the domain intervals for the pieces of the functions. After giving students a couple minutes to think about their answer, I switched up the problem so that the third segment had an arrow at the end; this allowed us to talk about how the domain and range would change if the line continued on forever.
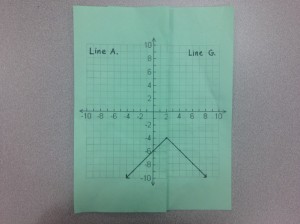
At this point, I gave each student his/her own graph (I quickly removed extras once I had taken attendance for each class period. Only one class had an odd number of students, so I partnered up someone who been absent for 2 days with another student.) Here are the 20 that I pre-made:
I asked students to examine their graph, and briefly examine the graphs around them. What is similar about your graphs (linear, slopes, restricted domains)? What is different (slopes, y-intercepts, equations)? Students copied their own graph onto this sheet, in the box labeled: “My Linear Function.”
Students wrote the equation for their line, and determined its domain. Then I told students that right now, they were alone. Their graph was alone. But that somewhere out there, it has a perfect match. I showed students how if they folded the graph at the x-value of the domain interval, they would be able to line it up with another classmate’s graph, to create a new function. I directed students to find their match, and sit with their new partner.
Original graphs:
Post folding:
With perfect match:
Students then shared everything they knew about their original line with their partner, and transferred the new information into the box: “My Partner’s Linear Function.” At this time, I asked students to recall earlier in the year when we studied piecewise linear functions, and how they were able to write the equation of each line segment. We talked about how they had not noticed that an absolute value function could be thought of as a composition of two linear pieces, until this moment. We talked about how easy they found it to write the equation for their individual piece, and it wasn’t much different adding in their partner’s piece. Students combined all the information to create “Our Absolute Value Function” and made observations about the two different forms the equations could be written. Most students recognized the the connection between the y-intercepts from piecewise notation as being the distance from the vertex (h units away from k).
When we tried another problem, I gave out yellow post-its so that students could hide part of the function, and focus on one line at a time. Some students prefer to use colored pencils to highlight the different pieces, so I also encourage this option.
I had every intention of giving students this exit ticket at the end of the period, but time ran away from us and I didn’t want to cut our earlier conversations short.
This is the second time I’ve attempted this activity, and I would do it again next year. I love how student pairs are determined by who is their perfect match, which gets my students to work with someone they usually don’t, and they know it’s completely random. I love how it’s close to Valentine’s Day, so we had a silly time with the idea of the Perfect Graph Match. I love how each student physically started out with only one line, and then did some paper folding to pair them with another. I love how this visual representation really shows the separation of the pieces, and that it’s a shared experience we can refer back to during the rest of the unit. And I love how it starts by activating students’ prior knowledge about lines, and how they could use that information in this new setting.
Would love to hear any feedback about this lesson, and if you try it in your room, please let me know how it goes!


")